 Ochrestack
Rigbake quick start
Installing Rigbake and your first export. The full manual, README.md, is inside the download, and so is this page, as docs/quick-start.md. Back to the Rigbake product page.
Install (Blender 4.2 LTS to 5.0, tested)
- Download
rigbake-1.2.5.zip. Install the zip itself; do not unzip it first. (To read the manual, open the zip; it isREADME.mdinside.) - In Blender, open Edit > Preferences > Get Extensions.
- Blender may first ask about internet access, with Continue Offline and Allow Online Access. Rigbake needs no internet, so Continue Offline is fine.
- Blender may then show a "Repository Alert" saying that the remote data of extensions.blender.org is unavailable. That message comes from Blender's online repository, not from Rigbake. You can ignore it.
- Open the drop-down menu (⌄) at the top right, choose Install from Disk... and pick the zip. The status bar says Installed "rigbake". Dragging the zip onto the Blender window also works.
- Press N in the 3D Viewport and open the Rigbake tab.
To update, install the newer zip the same way. To remove Rigbake, go to Preferences > Add-ons, find Rigbake, and choose Uninstall from its drop-down menu.
First export
- Select your character's armature, in Object Mode or Pose Mode.
- Selecting the mesh works too: the tab says, for example, "Armature: DEF (from Body)".
- With a control rig, select the deform rig or its mesh, not the control rig. Rigbake finds the control rig. With the control rig selected alone, Export Game-Ready is greyed out and the panel names the rig to select, with a Select button for it.
- Pick the Preset (Godot, Unity or Unreal) and the Folder.
- Below the File Name the tab shows the file and the clips it will write, for example "2 clips from CTRL: Walk, Run".
- "Save your file, or pick a Folder" means: save the .blend first. Export stays disabled until then.
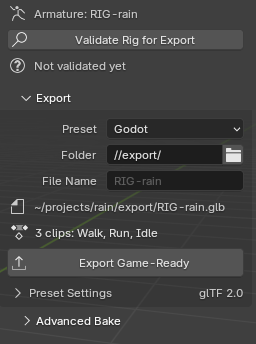
The Rigbake tab before the first export (Blender 4.2, real size). - Click Validate Rig for Export.
- Issues come first, each with its fix and a Select button. Apply Scale and Limit Weights fix in one click.
- Notes need nothing from you ("Handled: baked on export").
- Close closes the dialog; the tab keeps the counts and a Report button.
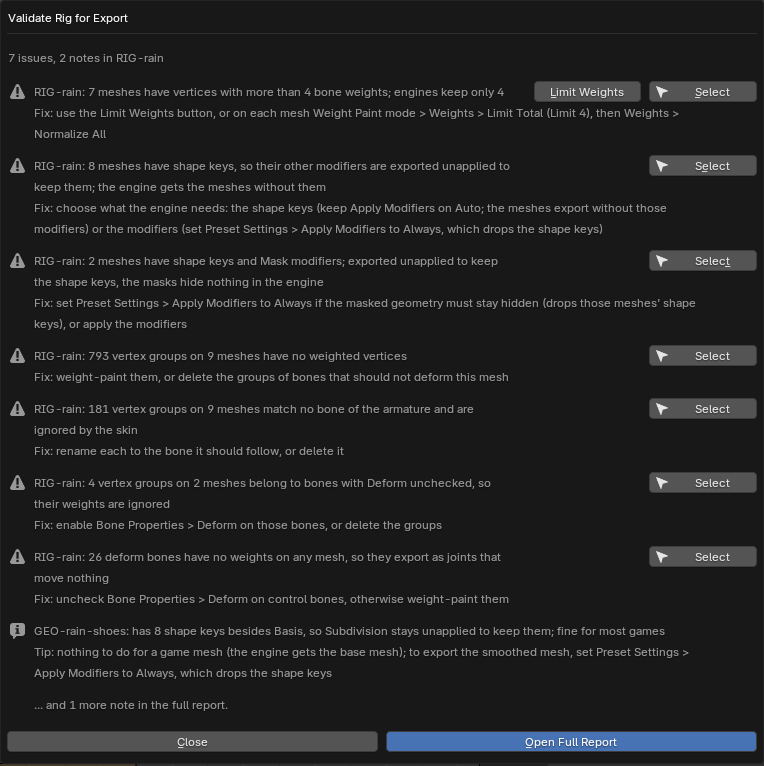
The dialog on a production rig. - Click Export Game-Ready.
- The status bar says what it wrote, for example "Exported 3 clips to RIG-rain.glb."
- The Last Export box lists each clip with its frame range, and one line per warning. Hover a line for the whole message. A mesh parented to a bone, such as a sword on a hand bone, is exported with the character, and the box names it.
- Exporting the same file again right away replaces it without asking. Otherwise (another file, or after you restart Blender) Rigbake asks before replacing a file.
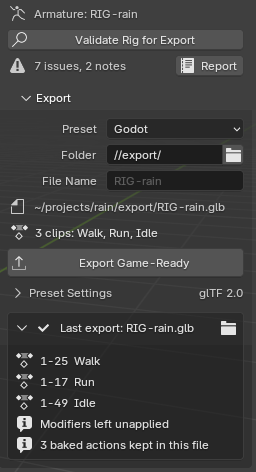
After the export.
Character in the images: Rain Rig (CC) Blender Foundation | studio.blender.org, used under CC BY 4.0, with animation clips we added. Rain is not included with Rigbake.
An armature that nothing animates (no actions, no NLA strips, no control rig, no constraints or drivers) shows "No clips: rest pose only"; the validator says so too, and the export writes it without clips.
Every action that is the armature's active action or sits on its NLA (stashed ones included) becomes its own clip, or every such action of the control rig. An action that is neither, for example one kept only by its fake user, is not exported: the panel names it above the Export button, and Add to NLA stashes it so the next export includes it.
The baked actions (Walk_baked, ...) stay in the .blend file so you can edit them; the Last Export box says how many. The next export replaces them. Delete them in the Outliner's Blender File view if you do not want them; the next export bakes them again.
Export Game-Ready bakes for you. Advanced Bake (closed by default) has the bake settings: Actions, Frame Range, Clips From, Keep Hand-Edited Bakes and Bake Before Export, and a button to bake without exporting.
Each clip is baked from the rest pose. If a warning says a clip "does not key" some bones that are posed in the viewport, the file shows those bones at rest, while the viewport still shows them where another clip or your hands left them.
Words used here
- NLA: Blender's Nonlinear Animation editor, where an armature's clips sit side by side. Stash puts an action there as a muted track; Push Down puts it on an unmuted track. Blender's own FBX export writes each clip on an unmuted track twice, and each stashed clip once, as
Rig|Clip, which can still be wrong (0.56 m off on a stashed clip in our checks). Rigbake writes one take per clip, named after the action, either way. - Take: one named animation inside an FBX file. An engine lists one animation per take.
- Control rig: a second armature that the animator keys; the exported deform rig, the one that bends the mesh, follows it through constraints.
Importing into Godot
The exported files are exact: re-imported into Blender, every bone is within 1e-5 m of the live rig. Two Godot import settings decide how exactly Godot plays them:
- Animation > FPS (Import dock, default 30): set it to your Blender frame rate (Scene Properties > Format > Frame Rate). Godot re-samples every clip at this rate.
- Optimizer of the AnimationPlayer (Import dock > Advanced... > select the AnimationPlayer node): on by default. It drops keys it judges redundant, which on fast motion put bones up to 13 cm off on our test rigs. Turn it off where you need the exact motion.
Click Reimport after changing them. With both set, every bone matched Blender within 0.0002 m in our check.
Limits
- Blender 4.2 LTS to 5.0 (tested). Checked in Godot 4.7 and in a real Blender 4.2 LTS window (1600x900 and 1280x720). The Unity preset's FBX was checked through Godot's FBX importer. The Unreal preset has not been checked in Unreal Engine. Neither has been opened in Unity or Unreal.
- Only bone motion is baked. Shape keys and their animation are exported as they are (Godot preset), or dropped with a warning (FBX presets, when the mesh has other modifiers). Custom properties and B-Bone properties are not baked. Keys are baked on whole frames.
- Motion keyed on the armature object itself is not exported; the validator and the Last Export box say so on every export. Blender's own FBX export would keep it.
- One control rig per deform rig. One file per export.
Privacy
Rigbake makes no network connections and sends nothing anywhere.
Support
Email [email protected] with your Blender version, the preset, the warnings from the Last Export box and, if you can, a .blend file that shows the problem.